Bedside Pacemaker Troubleshooting for CCRN Nurses: Rapid Verification
When a pacemaker misbehaves, run the systematic check in order: patient, lead, connection, generator, battery. Confirm the patient is hemodynamically stable before you touch a single setting. The four malfunction categories you need cold for the exam and the bedside are failure to pace, failure to capture, undersensing, and oversensing. If the patient is unstable, your rescue options are the magnet, asynchronous mode, transcutaneous pacing, and an emergency EP consult, in that order of speed.
TL;DR:
- The most common causes of pacemaker malfunction are lead displacement, loose connections, battery issues, or program settings, which must be systematically checked first.
- Failure to capture, indicated by pacing spikes without QRS complexes, often results from lead migration, elevated thresholds due to electrolytes, or low output settings.
- Undersensing, which can cause risky R-on-T phenomena, occurs when the device misses intrinsic beats, often due to interference or tall T waves, requiring immediate cardioversion readiness.
- Oversensing, caused by electromagnetic interference, muscle tremors, or tall T waves, leads the device to withhold pacing, especially during procedures like cautery or MRI scans.
- Reversible causes such as electrolyte imbalances, recent defibrillation, or medication effects should always be ruled out before considering hardware failure and escalating intervention.
Table of Contents
- Pacemaker Troubleshooting CCRN: Where to Start at the Bedside
- What Do the Four Pacemaker Malfunctions Look Like on the Monitor?
- Correcting Reversible Causes Behind Pacing Threshold Changes
- How Do You Safely Adjust Pacemaker Output and Sensitivity?
- How Do You Confirm the Fix Worked and When Do You Escalate?
- High-Yield Pacemaker Troubleshooting Pearls for the CCRN
- A Nurse-to-Nurse Take on Pacemaker Emergencies
- Get Faster at Pacemaker Scenarios With Zero Deficit™ Practice Questions
- Sources
- FAQ
Pacemaker Troubleshooting CCRN: Where to Start at the Bedside
Every pacemaker problem starts with the same question: is the patient tolerating this rhythm right now? Check the pulse, the arterial waveform if you have one, and the SpO2 pleth. A pacer spike with no palpable pulse or no arterial upstroke is a mechanical capture failure, even if the ECG looks like it’s pacing correctly. That distinction between electrical activity on the monitor and actual mechanical contraction is the single most tested concept in pacemaker questions on the CCRN, and it’s the first thing an experienced ICU nurse checks before assuming anything is broken.
Once you’ve confirmed the patient’s status, work the circuit from the body outward. This sequence, drawn from the LITFL temporary pacemaker troubleshooting guide, gives you a repeatable order that catches the majority of fixable problems before you ever call for backup:
- Patient: Reassess rhythm, pulse, and vital signs. Rule out a lead-independent cause like a new arrhythmia, seizure, or patient movement that dislodged a wire.
- Lead: Inspect the insertion or epicardial exit site for visible displacement, kinking, or bleeding. A lead that has migrated even a centimeter can lose contact with viable myocardium.
- Connection: Check every set screw and pin at the generator terminal. A loose set screw or incompletely seated pin is one of the most common and most fixable causes of intermittent loss of output in temporary pacing systems, and it’s often missed because it looks fine from a distance.
- Box (generator): Confirm mode (VVI, DDD, VOO, DOO), rate, output in milliamps, and sensitivity in millivolts match the order. Check that the box itself is powered on and the display isn’t showing a fault code.
- Battery: Swap it if there’s any doubt. Never troubleshoot for more than a minute or two on a battery you’re not sure about.
If the patient is unstable at any point in this sequence, stop and act. Increasing output, repositioning the patient onto their left side (which sometimes improves lead contact in transvenous systems), or switching to asynchronous mode for suspected interference are all reasonable bedside moves you can make without waiting for a physician order in most unit protocols, provided you’re working from an established pacing order. Document the time you found each abnormality. EP will want a timeline, not just a summary.
What Do the Four Pacemaker Malfunctions Look Like on the Monitor?
Pattern recognition is what separates a nurse who freezes at a strange rhythm strip from one who calls it correctly in ten seconds. Each malfunction has a signature look, and the clinical review of pacemaker malfunction that organizes most CCRN-relevant teaching breaks them into exactly these four categories.
Failure to pace means the device should have fired and didn’t. You’ll see no pacer spike where one is expected, based on the programmed rate, and often a pause longer than the escape interval. The patient may be asymptomatic if there’s an underlying rhythm, or profoundly bradycardic and symptomatic if they’re pacer-dependent. Causes range from a dead battery to a completely disconnected lead to oversensing that’s inappropriately inhibiting output.
Failure to capture is the one every CCRN candidate needs to nail cold: you see a pacer spike on the ECG, but no QRS complex follows it. Electrically, the device fired. Mechanically, nothing happened. This is where the pulse check or arterial line becomes non-negotiable, because a monitor showing “normal” pacing can be actively lying to you about perfusion. Common causes include lead displacement, elevated capture threshold from electrolyte shifts, or output set too low for the myocardium’s current threshold.
Undersensing happens when the device fails to see the patient’s own intrinsic cardiac activity and fires anyway, right on top of a native beat. On the strip, you’ll see a pacer spike falling inside or right after a native QRS, sometimes landing on the T wave. That last pattern, a spike landing on the T wave, is a genuine emergency. It creates R-on-T risk, and a pacing stimulus delivered during the heart’s vulnerable repolarization window can trigger ventricular fibrillation. If you see this pattern, treat it as a rhythm emergency: have the defibrillator at bedside, notify the team immediately, and prepare for a sensitivity adjustment or mode change without delay.
Oversensing is the mirror image. The device sees something that isn’t real intrinsic cardiac activity, tall T waves, myopotentials from muscle tremor, or electromagnetic interference from nearby equipment, and inappropriately withholds pacing output. On the strip, this looks like unexplained pauses or missing spikes where the programmed rate says one should have fired. In the ICU, the most common trigger is electromagnetic interference from electrocautery during a bedside procedure or from MRI compatibility issues, and it’s a predictable, anticipatable hazard rather than a random glitch.
- Failure to pace: No spike appears where expected; check battery, connections, and lead integrity first.
- Failure to capture: Spike appears, no QRS follows; verify with pulse or arterial waveform, not the monitor alone.
- Undersensing: Spike lands inappropriately close to or on a native beat; watch for R-on-T and have the defibrillator ready.
- Oversensing: Expected spike is missing; suspect EMI, tall T waves, or myopotentials before assuming battery failure.
Clinical reviews of pacing system malfunction consistently organize troubleshooting around these four buckets because nearly every bedside scenario you’ll face maps cleanly onto one of them, which is exactly why the CCRN exam blueprint tests recognition of each pattern rather than asking you to memorize obscure hardware failures.
Pro Tip: Before you page anyone, ask yourself whether this could be the device’s own automatic threshold test running, or an artifact from lead motion. Many “malfunctions” turn out to be normal algorithm behavior. Check the programmer log if one is available before declaring device failure.
Correcting Reversible Causes Behind Pacing Threshold Changes
Not every capture failure means a broken lead. Before anyone talks about reinserting a wire or calling EP for an emergent revision, run through the reversible causes that quietly raise pacing thresholds or mimic hardware failure outright.
Electrolyte and acid-base derangements top this list. Check these values immediately if capture threshold has climbed unexpectedly:
- Potassium (K+): normal range 3.5 to 5.0 mEq/L. Both hyperkalemia and severe hypokalemia can alter myocardial excitability and raise thresholds.
- Calcium (Ca2+): normal ionized range roughly 1.1 to 1.3 mmol/L. Hypocalcemia is a frequent, correctable contributor in ICU patients on massive transfusion or citrate-based CRRT.
- Magnesium (Mg2+): normal range 1.7 to 2.2 mg/dL. Low magnesium compounds arrhythmia risk and can worsen capture inconsistency.
- Acid-base status: significant acidosis blunts myocardial responsiveness to pacing stimuli independent of electrolyte values.
Medications and recent interventions matter just as much. Scan the med record for antiarrhythmics like flecainide or amiodarone, which can raise capture thresholds, and check the chart for any recent defibrillation. A shock delivered minutes or hours earlier can transiently elevate the threshold at the lead site, and the StatPearls review of pacing system malfunction flags recent defibrillation specifically as a temporal clue worth checking every time capture looks marginal.
Positioning and lead contact issues are mechanical rather than metabolic, but they’re just as fixable. A patient who’s shifted in bed can pull an epicardial or transvenous lead just enough to lose reliable contact. Try repositioning first. For temporary epicardial wires specifically, converting from a bipolar to a unipolar circuit, using the negative terminal with a subcutaneous return, can sometimes restore capture without any need to reoperate or reposition the wire itself.
The underlying discipline here is investigative, not reactive. Troubleshooting is a process of ruling out reversible causes, electrolyte abnormalities, recent defibrillation, medication effects, before you assume hardware failure and escalate toward invasive fixes. Pull labs, check the medication administration record, and ask about any procedures in the last few hours before you conclude the device itself has failed.
How Do You Safely Adjust Pacemaker Output and Sensitivity?
Once you’ve ruled out reversible causes, some fixes require adjusting the device itself. These are usually done under a physician or EP order, but you need to know the logic, because you’ll often be the one operationalizing it at 2 a.m.
- Locate the output dial (mA). Every temporary pacing box has an output control. If the ECG shows failure to capture and reversible causes are ruled out, the standard safety rule is to set the output at roughly two to three times the capture threshold, sometimes phrased as “double the threshold,” to build in a margin against further threshold drift.
- Know your ceiling. Most temporary external generators allow output up to 20 mA. If you’re near that ceiling and still not capturing, this is an escalation trigger, not a reason to keep turning the dial.
- Adjust sensitivity (mV) deliberately. Sensitivity settings typically range from about 2 to 5 mV for ventricular sensing in temporary systems. A lower mV number means the device is more sensitive, meaning it picks up smaller signals, which helps with undersensing. A higher mV number makes it less sensitive, which helps when myopotentials or T waves are triggering oversensing.
- Consider asynchronous mode for suspected interference. Switching to VOO or DOO removes the sensing circuit from the equation entirely, so the device paces at a fixed rate regardless of intrinsic activity. This is the standard mitigation during electrocautery or other predictable electromagnetic interference, and it’s a maneuver ICU teams should anticipate before a procedure starts, not scramble for during it.
- Apply a magnet only per your device and unit protocol. Magnet response varies by manufacturer and pacing system; know your unit’s specific device before you rely on this in a crisis.
Pro Tip: If you’re managing temporary epicardial wires and capture is marginal despite adequate output, ask about converting to a unipolar circuit before assuming the wire needs to be replaced. It’s a fast, low-risk maneuver that restores capture in select cases without another trip to the OR.
How Do You Confirm the Fix Worked and When Do You Escalate?
Verification is not optional, and it’s not the same as watching the monitor look better. Confirm mechanical capture directly: palpate a pulse that matches the paced rate, or watch for a corresponding upstroke on the arterial line. A rhythm strip that “looks paced” without a matching pulse is not a successful intervention, it’s a false reassurance you cannot afford to trust.
- Recheck hemodynamics immediately after any setting change. Blood pressure, pulse quality, and mental status should improve in step with the corrected rhythm.
- Interpret a magnet test carefully. If applying the magnet converts the rhythm to a fixed asynchronous pace, that tells you the sensing circuit, not the output circuit, was the problem. If it does nothing, the issue likely sits elsewhere in the pacing system or device programming.
- Set a firm threshold for calling for help. If you’ve worked the full checklist, patient, lead, connection, box, battery, and the patient remains symptomatic or capture remains unreliable, stop adjusting and prepare for transcutaneous pacing while you call for transvenous pacing or an EP consult. Waiting past this point to “try one more thing” is a common and avoidable delay.
- Document everything before you hand off. Save or print the rhythm strip showing the malfunction, record every setting you tried and in what order, and note the exact times of each intervention. EP will use this timeline to decide whether the problem is programmable or requires hardware revision.
Clinical guidance on temporary pacing consistently emphasizes having backup pacing ready and treating any symptomatic, pacemaker-dependent patient immediately rather than waiting for a definitive diagnosis before acting.
High-Yield Pacemaker Troubleshooting Pearls for the CCRN
A few one-liners will save you on exam day when the question gives you a strip and thirty seconds to decide.
- Spike, no QRS, no pulse: failure to capture. Check output and threshold, confirm mechanically, don’t trust the monitor alone.
- No spike, no QRS, patient’s dropping: failure to pace. Check battery and connections before touching sensitivity.
- Spike landing near or on a native beat, especially on the T wave: undersensing with R-on-T risk. Defibrillator at bedside, sensitivity adjustment, notify the team now.
- Missing spike where one’s expected, patient stable: oversensing. Think EMI, tall T waves, or myopotentials before assuming hardware failure.
Keep the electrolyte numbers close: potassium 3.5 to 5.0 mEq/L, ionized calcium roughly 1.1 to 1.3 mmol/L, magnesium 1.7 to 2.2 mg/dL. Exam questions built around pacemaker scenarios almost always reward the answer that prioritizes hemodynamic stability first, systematic checking second, and correct pattern recognition third, in that order, rather than the answer that jumps straight to a device fix. If you want a visual reference to lock in the decision points, the Zero Deficit™ Arrhythmia Flowchart walks through the same four-category logic used here, and pairing it with rhythm strip drills builds the pattern recognition speed the exam actually tests.
A Nurse-to-Nurse Take on Pacemaker Emergencies
The nurses who handle pacemaker emergencies well are not the ones who know every setting on every generator. They’re the ones who resist the urge to fix something invasive before they’ve documented and relayed a clean timeline to EP. That timeline, what you saw, what you tried, and when, is often more valuable to the physician on the phone than any single reading you report.
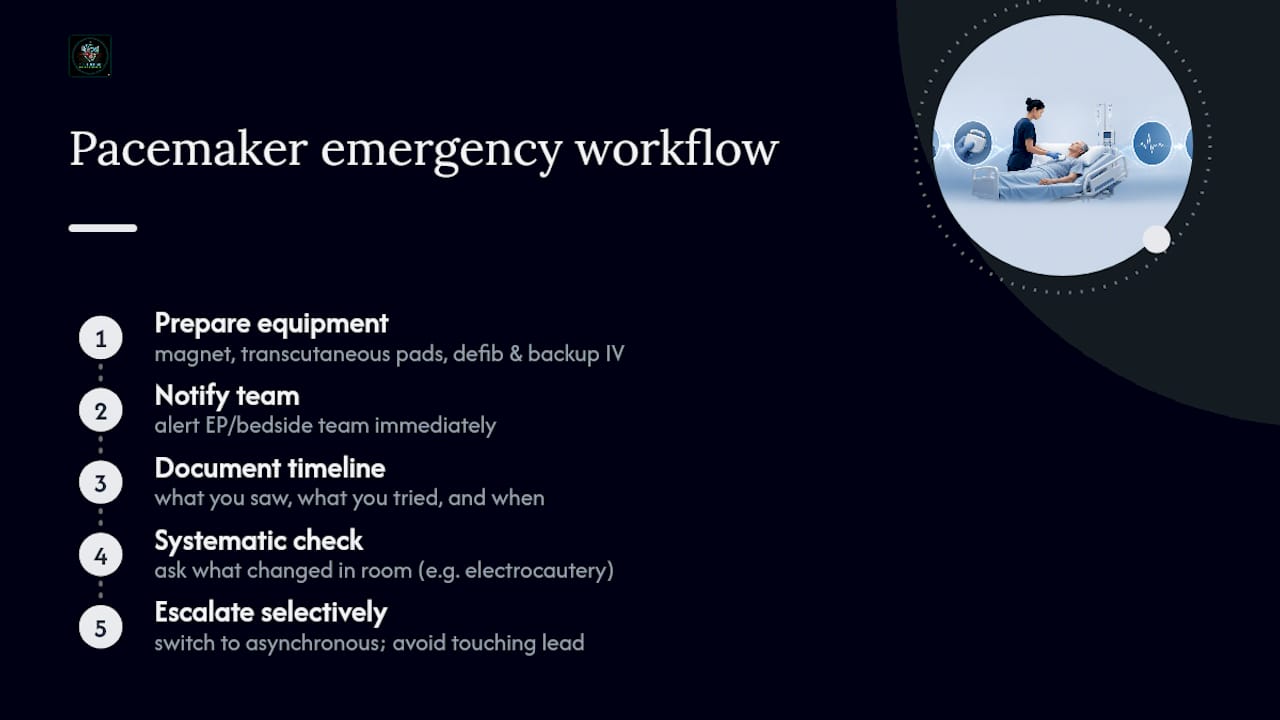
The workflow that works is boring on purpose: grab the magnet, transcutaneous pads, and confirm defib and backup IV access are within reach, notify the team, then start the systematic check. Consider a patient whose pacer spikes suddenly stopped capturing during a bedside line placement. The reflexive move is to assume lead failure. The correct move is to ask what changed in the room, because electrocautery from that same procedure is a textbook oversensing trigger. Switching to asynchronous mode resolved it in under a minute, without touching the lead at all.
That’s the pattern worth internalizing: check before you fix, and escalate on a clear trigger rather than a gut feeling.
— Zero
Get Faster at Pacemaker Scenarios With Zero Deficit™ Practice Questions
Reading about failure to capture is one thing. Recognizing it cold under exam pressure, or at 3 a.m. with a real patient in front of you, is another. Zero Deficit™ CCRN Prep gives you the repetition that closes that gap, with over 695 practice questions and detailed rationales written by ICU nurses who’ve stood at that bedside themselves.
The arrhythmia flowchart and rhythm-strip masterclass sharpen the same pattern recognition this article walked through, while the full CCRN practice test library lets you drill pacemaker and device scenarios alongside every other high-yield cardiovascular topic on the blueprint. Each question comes with a rationale that explains not just the right answer, but why the tempting wrong ones are wrong, which is exactly where most candidates lose points on device questions. Start with the 695+ CCRN practice question bank and see how your pacemaker recognition speed holds up under timed conditions before your exam date locks in.
Sources
For deeper study beyond this bedside playbook, these sources cover the clinical detail behind each malfunction category and troubleshooting algorithm referenced above.
- Temporary pacemaker troubleshooting — LITFL
- Pacing system malfunction: Evaluation and management — NCBI Bookshelf (StatPearls/NCBI)
FAQ
How Do You Troubleshoot a Pacemaker at the Bedside?
Work a fixed sequence: patient (pulse, hemodynamics), lead (visible displacement), connection (set screws, pins), generator (mode, output, sensitivity), then battery, escalating to asynchronous mode or transcutaneous pacing if the patient is unstable at any point.
How Can You Tell if a Pacemaker Is Malfunctioning?
Look for a mismatch between the ECG and the patient: pacer spikes without a following QRS, missing spikes at the expected rate, or spikes landing near a native beat, then confirm with a pulse check or arterial waveform rather than the monitor alone.
What Are the Four Common Pacemaker Malfunctions?
The four core categories are failure to pace, failure to capture, undersensing, and oversensing, each with a distinct ECG signature and its own set of likely causes.
What Are the Key Nursing Considerations for a Patient With a Pacemaker?
Prioritize hemodynamic assessment over monitor appearance, keep a magnet and transcutaneous pads within reach, verify capture mechanically, and rule out reversible causes like electrolyte shifts or recent defibrillation before assuming hardware failure.
When Should a Nurse Escalate a Suspected Pacemaker Failure?
Escalate to transcutaneous pacing and an emergency EP or physician consult once the full systematic check, patient through battery, is complete and the patient remains symptomatic or capture stays unreliable.
Recommended
Take a Cardiovascular practice quiz
Test your mastery of hemodynamics, ACLS, MI, arrhythmias, and heart failure.
Get Your Free 20-Question CCRN Diagnostic
20 high-yield CCRN-style questions across every body system, with detailed rationales — emailed to you instantly.
No spam. One email + a couple of helpful follow-ups. Unsubscribe anytime.
Ready to pass your CCRN?
Join 12,000+ nurses using Zero Deficit — 695+ practice questions with rationales, AI-powered weak-area drilling, and spaced-repetition flashcards.
Start Free Trial →